
NEWS
Completion Of A Journey
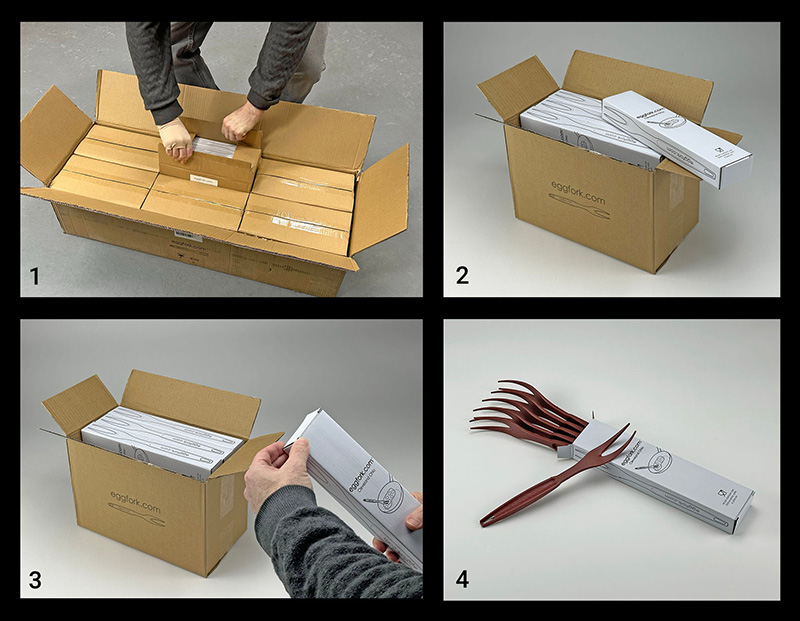
The Unboxing of a Product We Designed
At Design Interface, unboxing a product we’ve designed is always exciting. It marks the end of a journey—from concept to shelf-ready product. Seeing our work come to life, knowing it will reach consumers, is both humbling and rewarding. From the initial idea to the final packaging, we’ve been part of every step. Watching our vision evolve into a tangible product is the culmination of months of creativity and attention to detail, ensuring both flawless function and standout design.
What product can we help you design? Contact us and let’s get started!
Design Interface Inc. can show you what is possible. Our forward-thinking solutions for tradeshow booth design, product design, package design, medical device design, graphic design, and photography unlock the value of your ideas as we communicate your message and goals. See more here: https://designinterface.com/
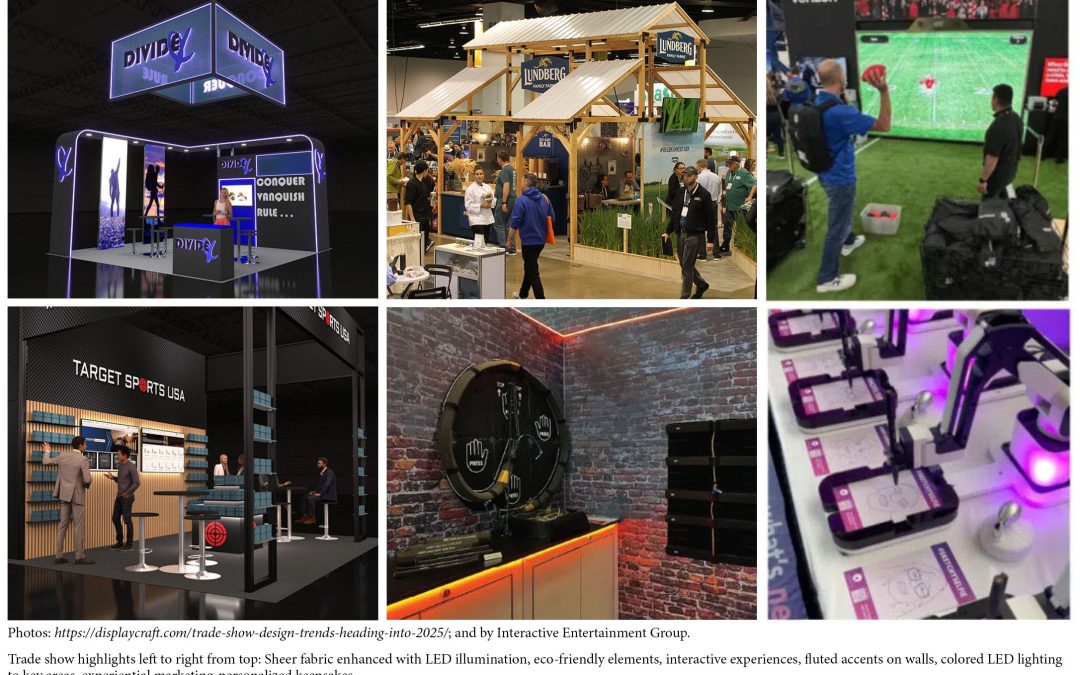
Trade Show Trends for 2025: What to Expect
Key Highlights
As trade shows continue to evolve, 2025 will bring a host of exciting new trends driven by technology, sustainability, and shifting attendee expectations. The landscape is transforming to deliver more engaging, personalized, and efficient experiences for both exhibitors and attendees. Here’s a look at the key trends shaping trade shows in 2025:
1. Immersive Experiences through Technology
The use of Augmented Reality (AR) and Virtual Reality (VR) will continue to grow, allowing brands to create interactive, immersive experiences that go beyond traditional product demonstrations.
2. Sustainability Takes Center Stage
Sustainability will remain a priority as eco-conscious practices take over the trade show floor. Exhibitors will increasingly opt for eco-friendly materials, reducing waste and minimizing their carbon footprint.
3. AI and Automation for Enhanced Engagement
AI-driven solutions will play a bigger role in personalizing attendee experiences, from automated lead capture to chatbots offering instant assistance.
4. The Rise of Hybrid Events
Hybrid events—those that combine in-person and virtual elements—will become the norm, allowing brands to reach a global audience while offering flexibility in participation.
5. Wellness and Comfort Zones
Recognizing the importance of attendee well-being, many trade shows will include wellness zones offering spaces for relaxation, recharging, and networking in a less formal environment.
6. Modular and Flexible Booth Designs
Gone are the days of static, traditional booths. In 2025, modular designs that allow exhibitors to create flexible, multifunctional spaces will dominate the trade show floor.
As we look ahead to 2025, these trends reflect a deeper integration of technology, sustainability, and personalization in the trade show world. Brands that embrace these shifts will have a significant edge in delivering memorable, impactful experiences.
Design Interface Inc. can show you what is possible. Our forward-thinking solutions for tradeshow booth design, product design, package design, medical device design, graphic design, and photography unlock the value of your ideas as we communicate your message and goals. See more here: https://designinterface.com/
Happy Holidays!
The team at Design Interface—Carla, Adrian, Anita, Doug, and Dan—wishes everyone a joyful and peaceful holiday season!
We are incredibly grateful for your support and collaboration this year. May your holidays be filled with warmth, laughter, and time spent with loved ones. Here’s to a bright and successful New Year ahead!
At Design Interface Inc., we go beyond package design. Our forward-thinking solutions for product design, medical device design, graphic design, and photography unlock your ideas’ full potential. Discover more here: https://designinterface.com/
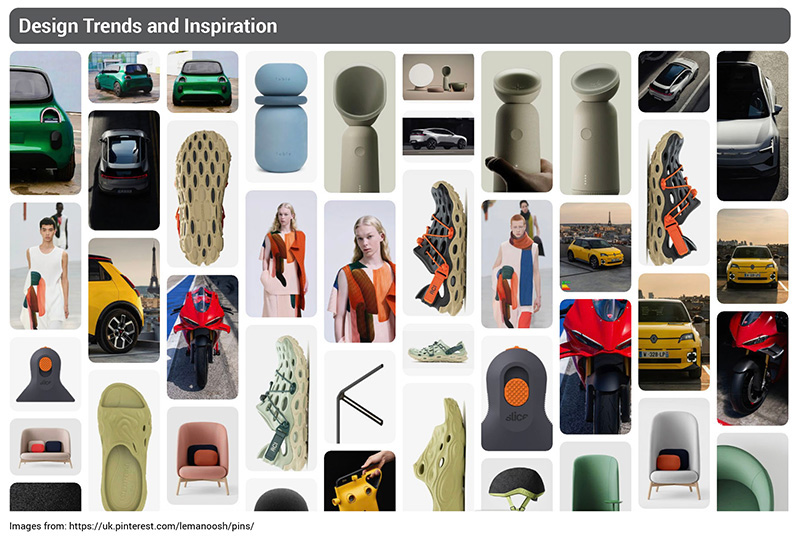
Discover Design Inspiration with leManoosh: A Must-Visit for Industrial and Graphic Designers
At Design Interface we are always in search of fresh, creative inspiration, and leManoosh is a website you don’t want to miss. Founded by a passionate designer, this platform curates a wide range of design content that sparks innovation across various design disciplines. From sleek product design to compelling visual aesthetics, leManoosh offers an extensive collection of work from leading designers around the globe. Whether you’re seeking cutting-edge industrial design concepts, branding ideas, or graphic design trends, the site is a valuable resource to fuel your creativity.
leManoosh stands out not just for its high-quality content but also for its emphasis on all stages of the design process. The site showcases work from initial sketches and prototypes to final, polished products and designs. This makes it particularly useful for both emerging designers and experienced professionals looking to refine their skills or explore new techniques. Whether you’re working on packaging design, typography, or user interface concepts, leManoosh presents a broad spectrum of visual styles and solutions that can inspire new approaches to your own work.
Beyond the design work itself, leManoosh fosters a community of like-minded creatives. The website encourages interaction and collaboration, offering designers an opportunity to connect with others, share ideas, and stay updated on industry trends. With its carefully curated selection of design projects and its commitment to showcasing the best in the field, leManoosh has become an indispensable tool for anyone in the design world, from those just starting out to seasoned experts seeking new inspiration.
To see what leManoosh is all about go to: https://lemanoosh.com/
At Design Interface Inc., we go beyond package design. Our forward-thinking solutions for product design, medical device design, graphic design, and photography unlock your ideas’ full potential. Discover more here: https://designinterface.com/

Pantone® Fashion Color Trend Report Autumn/Winter 2024/2025
I love sharing Pantone’s “Color of the Year ” here on the blog. Each year—and sometimes each season—Pantone predicts which colors will be popular. They just released their Pantone® Fashion Color Trend Report for Autumn/Winter 2024/2025.
This season’s colors embrace a rich, earthy vibe, connecting us to nature with warm tones, adaptable neutrals, and timeless greens. The Autumn/Winter 2024/2025 palette balances elegance and practicality, offering a confident, no-fuss style that reflects the trend toward mindful, lasting fashion.
Leatrice Eiseman, Executive Director of the Pantone Color Institute, explains that this season’s colors are a blend of familiar and fresh tones, designed to be long-lasting and work in any season. She says they are, “Functional and adaptable, they are reliable and robust, servicing our increasingly hybridized style of living, providing a strong chromatic foundation and at the same time delivering playful and energetic accents for moments of magic.”
Here is a list of the Pantone Fall 2024-25 Color Palette above
1. Tomato Cream
2. Scarlet Smile
3. Golden Palm
4. Aventurine
5. Red Orange
6. Fern
7. Italian Plum
8. Moonstruck
9. Winter Sky
10. Lucent White
New Classics
11. Winter Swan
12. Raw Umber
13. Dark Gull gray
14. Baritone Blue
15. Buckthorn Brown
Stay tuned for the 2025 Color of the Year! I’ll share it here as soon as Pantone announces it.
At Design Interface Inc., we go beyond package design. Our forward-thinking solutions for product design, medical device design, graphic design, and photography unlock your ideas’ full potential. Discover more here: https://designinterface.com/
Package Design Solution – Let’s Bring Your Product to Life!
At Design Interface, we’re all about helping your product stand out. Our package design services turn your vision into a beautifully crafted, professional package that leaves a lasting impression. Here’s how we do it:
1. Inspiring Concepts: We start with innovative concepts, laying out graphics and designing the dieline for a flawless fit that shows off your product.
2. Realistic Mockups: Next, we create detailed mockups, so you can see exactly how your product will look on the shelf before it even goes to print.
3. Seamless Production: Finally, we manage the printing process from start to finish to ensure a high-quality, polished package that grabs attention.
Our Package Design Services Include:
• Retail Package Design
• Product & Food Label Graphics
• UPC & GTIN Codes
• Merchandising Displays
• Prototypes and Mock-Ups
• Point-of-Purchase Displays (P.O.P.)
• Structural Packaging
• Die-cut Drawings
See Us in Action: Watch Our Video to experience how our designs can bring your ideas to life. https://designinterface.com/wp-content/uploads/2024/10/Packaging-Promo-22MB-241017.mp4
At Design Interface Inc., we go beyond package design. Our forward-thinking solutions for product design, medical device design, graphic design, and photography unlock your ideas’ full potential. Discover more here: https://designinterface.com/
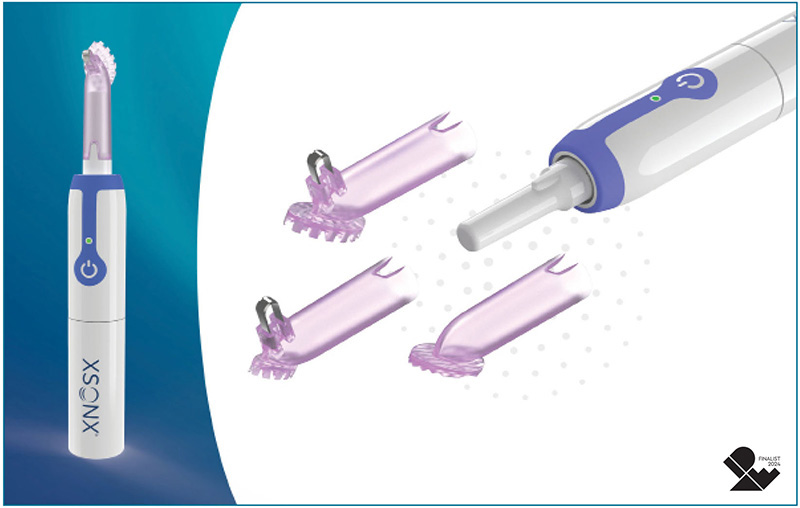
XSONX Named Finalist in Prestigious IDSA/IDEA Awards
Design Interface is thrilled to announce that its XSONX Wound Hygiene System was a finalist in the IDSA (Industrial Designers Society of America) IDEA Awards. Developed in collaboration with Dr. Wade Farrow, XSONX is a revolutionary medical device designed to elevate the standard of wound care.
The Genesis of Innovation
The XSONX Wound Hygiene System is the result of collaborative efforts between our talented team at Design Interface Inc. and the visionary inventor behind this groundbreaking technology. From concept to creation, we dedicated extensive development time to perfecting every detail, ensuring a product that not only meets but exceeds expectations. Adrian Slattery, the design team leader, commented, “After many years of development, I’m relieved it works to provide effective care for the patient.”
Micro-Vibrational Technology: A Game-Changer in Wound Care
The core of XSONX is its cordless system equipped with micro-vibrational technology. This cutting-edge feature allows for the powerful yet gentle cleaning and debridement of chronic and contaminated wounds. We understand the importance of precision in medical devices, so the system was refined through substantial testing, including trials with wound care professionals.
During the development phase, our team utilized oranges for initial testing, a testament to our commitment to thorough and responsible testing procedures. Patient safety and comfort are paramount, and we left no stone unturned to ensure that the XSONX Wound Hygiene System delivers on its promises.
Features that Redefine Wound Care
The XSONX Wound Hygiene System boasts a range of features that set it apart:
Slough and Biofilm Removal: The device effectively removes slough and biofilms, promoting a cleaner wound environment conducive to optimal healing.
Low-Frequency Vibrations: Operating at frequencies below 2.5kHz, the system minimizes pain perception, offering a more comfortable experience for wound care patients.
Simplified Healing: By simplifying wound hygiene, the XSONX system eliminates barriers to healing, providing a cost-effective and efficient alternative to current approaches.
Breaking Away from the Norm: XSONX vs. Current Approaches
Traditional wound care methods often involve sharp debridement associated with higher pain levels. The XSONX Wound Hygiene System challenges this norm, offering a user-friendly, pain-reducing solution that enhances the overall healing process.
The XSONX Wound Hygiene System offers versatility with three distinct wound heads: Scrubbing Head (#1): Ideal for thorough cleaning of wounds. Small Debriding Head (#4S): Designed for precision in debriding smaller areas. Debriding Head (#4): Offering a broader debriding capability for larger wound areas.
Read a detailed Case Study here: https://designinterface.com/wp-content/uploads/2024/10/XSONX-Case-Study-Award.pdf
Visit the XSONX website at https://xsonx.com/ to see the innovative world of the XSONX Wound Hygiene System.At Design Interface Inc., we don’t just design products; we create solutions that make a difference.
Design Interface Inc. can show you what is possible. Our forward-thinking solutions for product design, package design, medical device design, graphic design, and photography unlock the value of your ideas as we communicate your message and goals. See more here: https://designinterface.com/
Unfolding Creativity: The Power of a Promotional Folded Business Card
In today’s competitive market, making a great first impression is key. One simple but effective marketing tool is the promotional folded business card. Designed by a professional graphic design firm, this card goes beyond just sharing contact details—it highlights your brand’s identity, services, and values. It’s a smart investment for businesses that want to stand out and leave a lasting impression.
Maximizing Space for Your Message: Unlike regular business cards, a folded card gives you double the space. This extra room lets you showcase your products, services, or special offers in a clear and eye-catching way. Whether it’s a tagline, images, or key information, the folded design helps you communicate your message creatively and professionally.
Showcasing Creativity and Professionalism: A well-designed folded business card shows your brand’s attention to detail and quality. With custom layouts, colors, and premium materials, it acts as a mini portfolio, demonstrating your company’s creativity and professionalism. A good design helps build trust and shows potential clients that your brand is reliable and innovative.
Building Strong Connections: The unique folded design sparks curiosity, encouraging people to spend more time with your card. Adding features like QR codes can link potential clients to your website or portfolio, blending print and digital marketing. This helps your business stay memorable and strengthens your connection with clients for the long term.
Design Interface Inc. can show you what is possible. Our forward-thinking solutions for product design, package design, medical device design, graphic design, and photography unlock the value of your ideas as we communicate your message and goals. See more here: https://designinterface.com/
AI And Graphic Design
In 2024, artificial intelligence (AI) is changing graphic design in exciting ways. AI tools can now handle routine tasks like resizing images or picking color schemes. This means graphic designers can spend less time on these repetitive jobs and focus more on creative work, new ideas, and designs. Tools such as Adobe Firefly and DALL-E 2 help designers work faster and more efficiently, making it easier to manage larger projects and meet deadlines.
However, using AI in graphic design also has its challenges. While AI can suggest design ideas and generate options quickly, it sometimes relies on existing data, leading to designs that lack originality. Additionally, there are important issues to consider, like ensuring data privacy and avoiding biases in AI algorithms. Even with these concerns, AI is a valuable tool that, when combined with a designer’s creativity and skills, helps create more innovative and effective designs.
The integration of AI for graphic design undoubtedly offers numerous benefits, but it still can’t do what humans can. For businesses seeking exceptional graphic design services, hiring a design agency like Design Interface Inc. offers a multitude of advantages.
Design Interface Inc. can show you what is possible. Our forward-thinking solutions for product design, package design, medical device design, graphic design, and photography unlock the value of your ideas as we communicate your message and goals. See more here: https://designinterface.com/
Retail Package Design Services
Design Interface specializes in retail package design services that bring your product vision to life. Our process begins with concepts for the layout of graphics and determination of the dieline to ensure a perfect fit. We then create detailed mockups of the package, allowing you to visualize the final product before it goes to print. Finally, we oversee the printing process to deliver a high-quality, professionally finished package that stands out on the shelf.
Design Interface Inc. can show you what is possible. Our forward-thinking solutions for product design, package design, medical device design, graphic design, and photography unlock the value of your ideas as we communicate your message and goals. See more here: https://designinterface.com/
