NEWS
Is Canva a Good Tool for Businesses and Designers?
Canva has become a popular tool for quick and easy design solutions, appealing to both businesses and designers. It offers a variety of templates, from mood boards and social media posts to business cards and invitations. For businesses with tight budgets, Canva is a game-changer, providing a DIY design solution that is cost-effective and efficient. However, while Canva is convenient and accessible, it might not always yield unique or high-quality designs, which can be crucial for maintaining brand consistency and professional image. Experienced designers understand that true branding goes beyond just a logo and requires consistency in elements, fonts, and colors to effectively convey a brand’s identity and boost its appeal.
For businesses, Canva’s ease of use and cost-effectiveness make it an attractive option. It allows even those with no design experience to create graphics quickly. However, this convenience can come at the cost of originality and consistency, crucial elements for effective branding. For professional designers, Canva can be both a useful tool and a limiting factor. While some designers use Canva for quick projects or to create templates for non-designers, the platform’s limitations become apparent when compared to more robust software like Adobe suite. Canva’s ease of use makes it accessible for beginners, but it also means that it lacks the depth and flexibility required for more complex design tasks. One big downfall for professional designers is that you cannot trademark a logo created on Canva so if you are a logo creator or creating a brand for a company Canva is not the way to go. Professional design software like Adobe offers a richer set of tools and greater creative freedom, essential for developing unique and sophisticated designs. For aspiring designers, relying solely on Canva can hinder the development of fundamental design skills and limit their creative growth. While Canva is great for quick and simple projects, it falls short as a comprehensive design solution for professionals.
Design Interface Inc. can show you what is possible. Our forward-thinking solutions for product design, package design, medical device design, graphic design, and photography unlock the value of your ideas as we communicate your message and goals. See more here: https://designinterface.com/
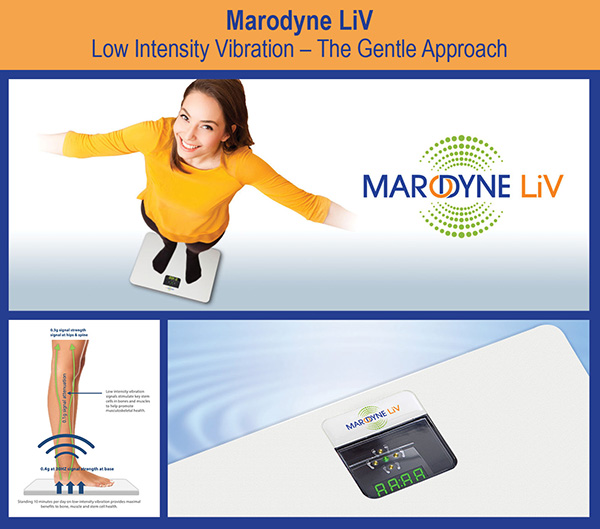
Marodyne LiV
Applying our industrial design skills, we helped to define the product form and features for Marodyne LiV, a bone growth and muscle stimulation device specifically developed to increase bone density and quality, while also activating and conditioning the leg muscles in a safe and effective manner.
A very precise low-level vibration is transmitted at a high frequency to the body while standing on the device. Only 10 minutes a day is sufficient to make your bones and muscles stronger, and this level of vibration is safe.
People with osteoporosis or decreased bone density (osteopenia), or those with reduced muscle strength, balance problems, and risk of falling can easily, safely, and effectively overcome these conditions by utilizing Marodyne LiV for 10 minutes per day. This preventive, natural way of bone and muscle stimulation can help you to live a longer, healthier, and independent life. For more information about Marodyne LiV go to: https://marodyne.btt-health.com/
Design Interface Inc. can show you what is possible. Our forward-thinking solutions for product design, package design, medical device design, graphic design, and photography unlock the value of your ideas as we communicate your message and goals. See more here: https://designinterface.com/
Package Design
Have you ever felt compelled to buy something just because of its packaging? Tapping into the emotions of your target audience plays an important role in the success of your product.
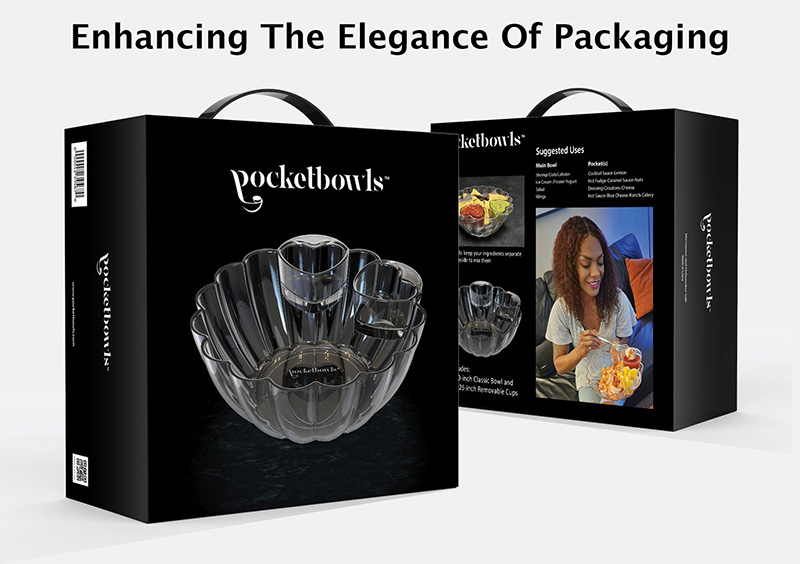
Well-designed packaging acts as a “silent salesperson,” swiftly transforming a mere want into a need and captivating the buyer. The interplay of structure, color, imagery, and fonts should connect with consumers on an emotional level and narrate your brand’s story. Here’s a prime example of creative packaging that effectively conveys the product’s story.
At Design Interface, we created both the product and packaging for Pocketbowls Chip and Dip Bowl Set. For the packaging, we aimed for a sophisticated look with a classic black exterior, featuring a photo of the product on the front. The back showcases a lifestyle image of the bowls in use, along with suggestions for what you can serve in them. This design not only highlights the product’s versatility but also appeals to consumers seeking both functionality and elegance without the upscale price.
Design Interface Inc. can show you what is possible. Our forward-thinking solutions for product design, package design, medical device design, graphic design, and photography unlock the value of your ideas as we communicate your message and goals. See more here: https://designinterface.com/

Virtually ABBA
On a recent trip to London, Adrian attended the AI-generated ABBA Voyage concert hosted at the ABBA customized arena. The event showcased the iconic supergroup, all now in their seventies, performing with renewed vigor. Here’s the twist…their faces were AI-generated to make them thirty years old!
Rather than embarking on a taxing world tour, the band opted for this innovative approach, utilizing motion-capture technology and digital enhancements to present themselves as digitally animated avatars. Live musicians accompanied them on an actual stage. This futuristic rendition is obviously captivating audiences with $150 million in sales and a record 99% full house every night.
Here is a video explaining how the magic was created.
Design Interface Inc. can show you what is possible. Our forward-thinking solutions for product design, package design, medical device design, graphic design, and photography unlock the value of your ideas as we communicate your message and goals. See more here: https://designinterface.com/
Howling Good Time!
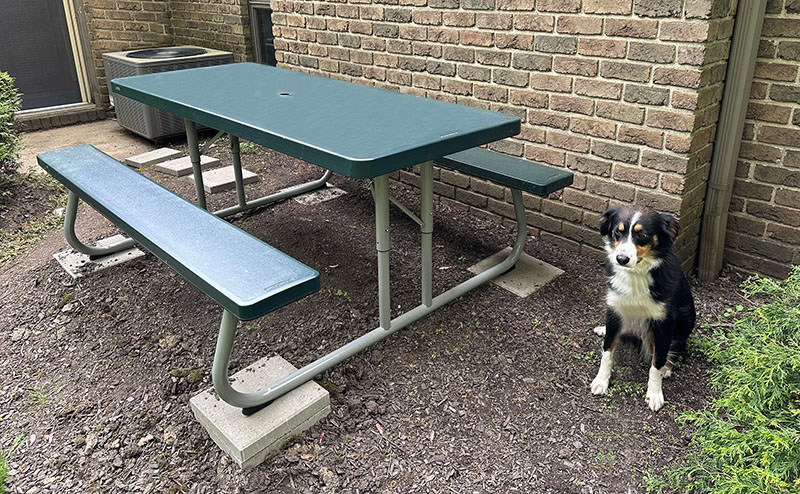
New Dog and Table Fetch Fun at Work
We have two new additions to bark about at Design Interface this week. First, our new furry team member named Doris, an Australian Shepard, and second a new outdoor meeting and eating picnic table area. Both are great benefits to our work environment helping with stress, boosting morale, and making us smile day in and day out.
Design Interface Inc. can show you what is paws-sible. There are no bones about our forward-thinking solutions for product design, package design, medical device design, graphic design, and photography unlock the value of your ideas as we communicate your message and goals. See more here: https://designinterface.com/
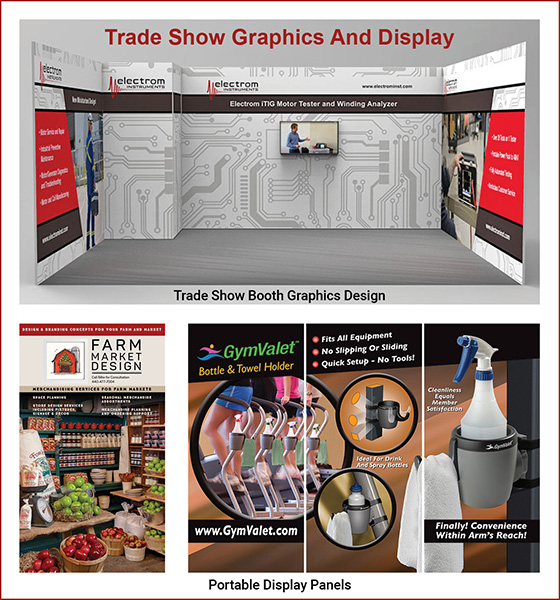
Wondering how to make a splash at your next trade show?
Look no further for the solution you need! At Design Interface, we specialize in creating captivating graphics that not only capture attention but also embody your brand essence, ensuring your space commands the spotlight. Standing out on a bustling show floor becomes effortless with our expertise. Our mission is to create an outstanding design, making it accessible to all.
• Display Graphics
• Booth Design
• Hand Outs
• Signage
• Tradeshow Graphics & Displays
Design Interface Inc. can show you what is possible. Our forward-thinking solutions for product design, package design, medical device design, graphic design, and photography unlock the value of your ideas as we communicate your message and goals. See more here: https://designinterface.com/
Check Out Our Latest Product Animation Reel
We are thrilled about the introduction of the XSTIM Spine Fusion Stimulation Therapy device, which incorporates state-of-the-art capacitive coupling technology to stimulate bone growth. The Xstim Spinal Fusion Stimulator is an FDA-approved class 3 device, clinically demonstrated to enhance bone healing post spinal fusion surgery or for individuals in need of treatment due to a failed fusion from a prior surgical procedure. Design Interface has collaborated with XSTIM over the past year to develop engineering blueprints and a product animation for their newest innovation.
Design Interface Inc. can show you what is possible. Our forward-thinking solutions for product design, package design, medical device design, graphic design, and photography unlock the value of your ideas as we communicate your message and goals. See more here: https://designinterface.com/

Sketching Designs In Virtual Reality (VR) With Oculus Quest
Our team at Design Interface recently tested the Oculus Quest 2 headset for Virtual Reality (VR) design using the Gravity Sketch app. Led by Daniel Roth, who has experience designing a Little Tikes toy at the Cleveland Institute of Art, our goal was to try out this technology.
Oculus Quest 2 impressed us with its well-designed Meta product, consisting of a headset with built-in computing power and two hand wands for drawing control. The User Interface (UI) is integrated into the screen, and hand controllers with buttons enhance the drawing experience.
A notable feature was the straightforward integration of the User Interface (UI) into the screen, with hand controllers acting as digital brushes and palettes. This intuitive process, coupled with real-time responsiveness, made the VR design experience user-friendly.
The Teams’ User Experience (UX) Reactions:
Daniel: “Gravity Sketch is a great tool for working out ideas in broad strokes (similar to sketching). The interface with Sub-D surfaces is especially good. One thing I have found is that it lacks granular control. Everything is loose and gesture-based, and some finesse would make it that much better. As far as downsides, my main complaint is that I wish there were more adjustments for people who wear glasses. Also, I get headaches after being in VR for too long.”
Anita: “I liked the feel of the headset on my head. It was not too heavy and did not bother my nose or eyes. It was very cool to see the whole object in 3D. The instructions were clear and easy to follow, along with the steps to start the program. The controllers would take some getting used to, but they felt comfortable in my hands. I did not get the chance to draw with it, so I cannot give my opinion on its use as a drawing tool. I would be very interested in using it.”
Adrian: “An exciting and novel way of approaching the sketch.” It’s a bit clumsy like the Ford Model T, but this is a new way, and it will only get better and more precise with time. Add a little verbal instruction to an AI engine, and the virtual sky is the limit.”
Doug: “I was impressed with the immersive environment and appeared to track well with my head movements. I felt a little woozy afterward. This might be useful for designing larger objects like furniture or cars, but I wonder how useful it is for smaller items with detail.”
Carla: “It really is a different reality and takes some getting used to for spatial awareness. Weird, but interesting! I can’t say I want to jump in and do all my sketching with this. It did cause some nausea and a slight headache afterward.”
Design Interface Inc. can show you what is possible. Our forward-thinking solutions for product design, package design, medical device design, graphic design, and photography unlock the value of your ideas as we communicate your message and goals. See more here: https://designinterface.com/
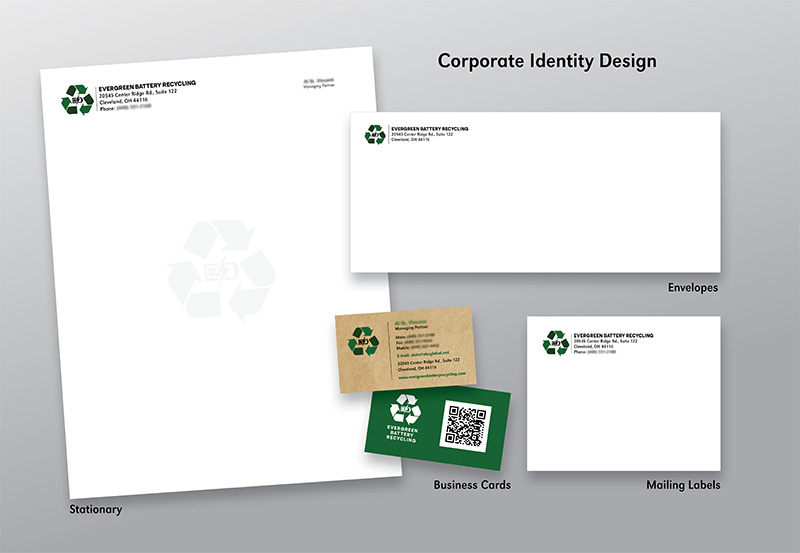
What is Corporate Identity & Why It Is Important for a Strong Brand
Corporate identity is like a company’s personality. It’s how a business acts, talks, and is seen by people. This includes the company name, logo, colors, and how it presents itself to the public. Design Interface recently completed the corporate identity program shown above.
A strong corporate identity is important because it helps a company be recognized by its customers and stand out from competitors. Everyone in the company, like the employees and investors, plays a part in creating this identity.
One big part of corporate identity is the design, like the logo and colors used by the company. This helps the company look unique and different from others.
Now, there’s a difference between branding and corporate identity. Branding is about a specific product and its features, while corporate identity is about the whole company and its values.
Brand identity is about how a company wants to be seen by its customers. It’s the message that customers get from the company. Keeping this message consistent is important for customers to remember and trust the brand.
Why is all of this important? Well, a solid corporate identity helps a company in many ways:
Builds customer loyalty: Customers become loyal when they connect with a brand’s values.
Enhances reputation: Consistent identity and good service build trust.
Creates awareness: A clear identity makes a brand easy to recognize.
Helps with differentiation: Standing out from competitors is easier with a strong identity.
So, having a positive corporate identity is a big deal for any company, whether big or small. It helps shape how people see the company, leading to more success in the market.
If you want to improve your company’s identity, Design Interface can help. We specialize in making it easy for companies to manage their brand and create a positive image. Contact us to learn more!
Design Interface Inc. can show you what is possible. Our forward-thinking solutions for product design, package design, medical device design, graphic design, and photography unlock the value of your ideas as we communicate your message and goals. See more here: https://designinterface.com/
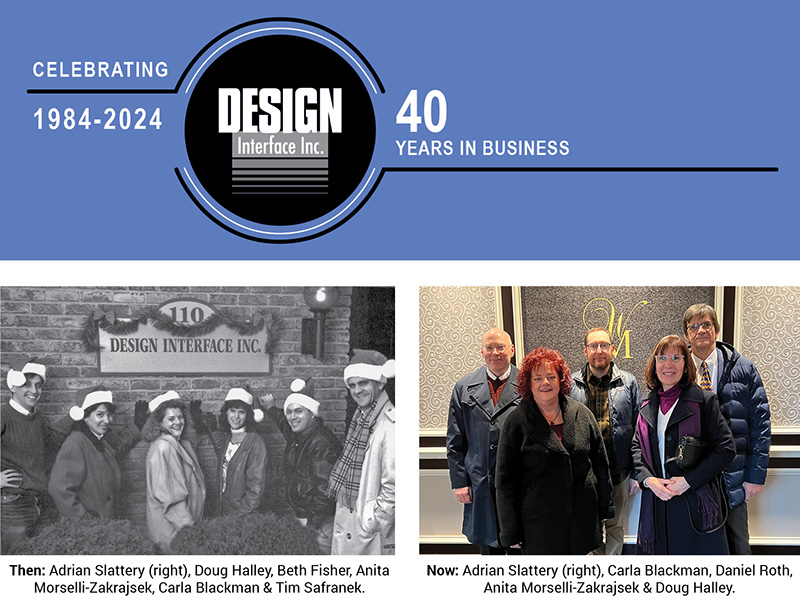
Celebrating 40 Years
Our Story
For 40 years, Design Interface has been the go-to source for turning new product ideas into reality. Through three recessions and a loyal client base, we’ve stood the test of time.
Back in 1976, Carla and Adrian met at Central St. Martin’s in London, both graduating with BA (Hons) degrees in Industrial Design and later earning MBAs. According to them, the real deal with Design Interface is that it gave them control over their lives.
Carla kicked off the business in 1984 with freelance graphics after her MBA. Adrian, also armed with an MBA, joined later. The first client, Rossborough Manufacturing, came in 1984, coincidentally Adrian’s employer at the time. With a one-year-old son, David, in tow, Adrian left his job in 1987, and the second child, Jenna, arrived. That’s when the business expanded, taking on more industrial design work and larger projects.
Anita Morselli-Zakrajsek and Douglas Halley, our stellar employees, have been crucial to our success, sticking with us for over 30 years and consistently delivering exceptional work. We owe much of our journey to their dedication. Also, we recently added a new CIA alumnus, Daniel Roth, to our industrial design team.
Design Interface Inc. can show you what is possible. Our forward-thinking solutions for product design, package design, medical device design, graphic design, and photography unlock the value of your ideas as we communicate your message and goals. See more here: https://designinterface.com/
To view our full history go to the Design Interface legacy book at: https://designinterface.com/wp-content/uploads/2023/04/DI_HISTORY_BOOK_LAYOUT_010923.pdf


